My first rental duplex had a flat roof, so I have years of experience dealing with ice dams. My current house, which is otherwise pretty great, has aged box gutters that have been leaking for two years (mostly because I put off fixing them after the high-priced roofer did a bad job). That means that when we get ice dams, water leaks in some of our window frames from the gutters.
An ice dam is ice that forms in your downspout. Snow melts under the ice on the roof because your house is warm, but with the downspout blocked, there's nowhere for it to go. If you're unlucky, it goes down, through your roof or gutter and into your house. Unless you can get the downspout unfrozen or remove all the snow and ice from your roof, it's going to keep leaking.
So, not much you can do outside until spring. But inside, there are a few techniques you can use to control the water.
Obviously, you want to deploy buckets. But it's tough to get the buckets right under all the drips, and even when you have a well-placed bucket, once it starts to fill up there's a lot of splashing, and that gets your floor wet too.
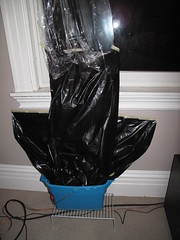
The solution is plastic. Dry cleaning bags work great, and trash bags are good too. (If you don't split the trash bags open to cover more area, you usually can reuse them for trash afterward.) If you have big problems, you can try those plastic painting drop cloths, as long as they're not too heavy for the tape.
Here's what to do.
- Tape the plastic bag up on the wall or window so that the dripping water falls onto it. You can use multiple pieces of plastic if you overlap the top piece in front of the bottom piece so the water falls down onto the second piece.
- Make a plastic highway to the collection area (bucket or trash can or whatever). You actually can move the bucket several feet from the leak, as long as the bucket is the lowest point in the system and there's a clean path to the bucket.
- Watch the water flow. If it's dripping off an edge, try to curl the plastic inward so that it funnels the water back toward the center.
- If you still have trouble with splashing, move the bucket farther away from the wall. The more gradual slope will slow the water down and minimize splashes. Make sure you don't create a low point on the way to the bucket.

The plastic is taped to the window frame with scotch tape. You can see the brown spots where the water was dripping. (Click through for a larger version on Flickr.)

Here is the bottom of the system. I had water leaking from underneath the bottom of the windowsill so I taped up another bag there. I used masking tape there because I was afraid Scotch tape would tear the paint (still not sure the masking tape won't, but whatever). I had to wait until the wall was dry to get the tape to stick. This picture also shows the transition from dry-cleaning plastic to trash bag. I taped the trash bag to the window to catch another drip, but you can just tape it to the top bag (it is also taped to the dry-cleaning bag, but that's hard to see).
If you're going to be away for a while, you can use a trash can instead of buckets, it holds more water. Also, drips usually stop a few hours after dark when the roof water refreezes, so that gives you a chance to regroup. But don't leave your bucket out of the system for long!
I've often wondered if strings would be useful, but I've never tried it. For example, if you have a drip on the ceiling can you tack up a string and get the water to preferentially run down the string into a bucket?
Oh, another few tips. If you can access your roof or gutters by leaning out a window (carefully!), you can sometimes help clear the ice. A hockey stick is a great tool for this. We use my old stick to flick ice out of the gutters and to chop up the ice into flippable pieces. Be careful not to damage your shingles, or to clobber someone on the ground. We also pour warm water into the gutters to melt the downspouts. After the first storm we were alternating pouring in buckets of water and pumping the standing water out of the downspouts with a tiny battery-operated pump (you could also use a straight siphon or a drill-mounted pump).
There are gutter heater cables you can use to help melt ice from your roof shingles and downspouts. They're not much help once the ice is up there, you have to have a roofer install them ahead of time.
So, hope this is helpful - or at least amusing.

1 comment:
Ooh, I found out that a friend of mine has used the "strings" method. I think she said you could actually attach them to paperclips and shove the clips into the paint bubbles as anchors.
Post a Comment